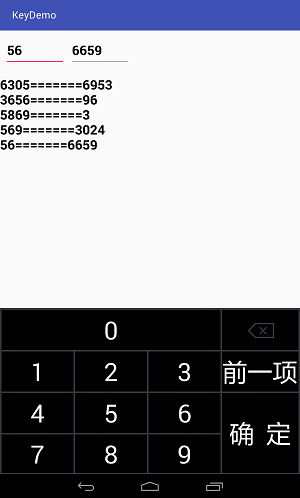
功能说明:
适用于两个EditText输入框,并控制输入字符的长度,点击键盘中的"确定"按钮完成输入,点击"前一项"光标跳到前一个EditText
运行效果图如下:

布局文件
 1 <?xml version="1.0" encoding="utf-8"?>
 2 <LinearLayout xmlns:android="http://schemas.android.com/apk/res/android"
 3     xmlns:tools="http://schemas.android.com/tools"
 4     android:layout_width="match_parent"
 5     android:layout_height="match_parent"
 6     android:orientation="vertical"
 7     android:focusable="true"
 8     android:focusableInTouchMode="true">
 9
10     <LinearLayout
11         android:layout_marginTop="10dp"
12         android:layout_width="match_parent"
13         android:layout_height="60dp">
14
15         <EditText
16             android:id="@+id/edt1"
17             android:maxLength="4"
18             android:textSize="20sp"
19             android:textColor="#000000"
20             android:textStyle="bold"
21             android:layout_marginLeft="10dp"
22             android:selectAllOnFocus="true"
23             android:focusableInTouchMode="true"
24             android:layout_width="120dp"
25             android:layout_height="match_parent" />
26
27         <EditText
28             android:textSize="20sp"
29             android:textColor="#000000"
30             android:textStyle="bold"
31             android:id="@+id/edt2"
32             android:maxLength="4"
33             android:selectAllOnFocus="true"
34             android:layout_marginLeft="10dp"
35             android:layout_width="120dp"
36             android:layout_height="match_parent" />
37     </LinearLayout>
38     <TextView
39         android:textSize="20sp"
40         android:textColor="#000000"
41         android:textStyle="bold"
42         android:layout_marginTop="20dp"
43         android:id="@+id/tv"
44         android:layout_width="match_parent"
45         android:layout_height="400dp" />
46     <include
47         android:layout_marginTop="65dp"
48         android:layout_width="match_parent"
49         android:layout_height="wrap_content"
50         android:layout_alignParentBottom="true"
51         layout="@layout/gridlayout"/>
52 </LinearLayout>
<?xml version="1.0" encoding="utf-8"?>
<GridLayout xmlns:android="http://schemas.android.com/apk/res/android"
    android:layout_width="match_parent"
    android:layout_height="match_parent"
    android:background="#34373e">
    <Button
        android:layout_marginTop="4dp"
        android:layout_marginLeft="3dp"
        android:id="@+id/txt0"
        android:layout_width="350dp"
        android:layout_height="80dp"
        android:layout_column="0"
        android:layout_columnSpan="3"
        android:layout_gravity="fill_horizontal"
        android:layout_row="1"
        android:background="#000000"
        android:textColor="#FFFFFF"
        android:textSize="50dp"
        android:text="0" />

    <ImageButton
        android:layout_marginTop="4dp"
        android:layout_marginLeft="3dp"
        android:layout_marginRight="5dp"
        android:id="@+id/delete"
        android:layout_width="153dp"
        android:layout_height="80dp"
        android:background="#000000"
        android:textColor="#FFFFFF"
        android:layout_column="3"
        android:layout_gravity="fill_horizontal"
        android:layout_row="1"
        android:src="@drawable/delete" />

    <Button
        android:layout_marginTop="3dp"
        android:layout_marginLeft="3dp"
        android:id="@+id/txt1"
        android:layout_width="144dp"
        android:layout_height="80dp"
        android:layout_column="0"
        android:layout_row="2"
        android:background="#000000"
        android:textColor="#FFFFFF"
        android:textSize="50dp"
        android:text="1" />

    <Button
        android:layout_marginTop="3dp"
        android:layout_marginLeft="3dp"
        android:id="@+id/txt2"
        android:layout_width="144dp"
        android:layout_height="80dp"
        android:layout_column="1"
        android:layout_row="2"
        android:background="#000000"
        android:textColor="#FFFFFF"
        android:textSize="50dp"
        android:text="2" />

    <Button
        android:layout_marginTop="3dp"
        android:layout_marginLeft="3dp"
        android:id="@+id/txt3"
        android:layout_width="144dp"
        android:layout_height="80dp"
        android:layout_column="2"
        android:layout_row="2"
        android:background="#000000"
        android:textColor="#FFFFFF"
        android:textSize="50dp"
        android:text="3" />

    <Button
        android:layout_marginTop="3dp"
        android:layout_marginLeft="3dp"
        android:layout_marginRight="5dp"
        android:id="@+id/next"
        android:layout_width="123dp"
        android:layout_height="80dp"
        android:layout_column="3"
        android:layout_gravity="fill_horizontal"
        android:layout_row="2"
        android:textSize="50dp"
        android:text="前一项"
        android:background="#000000"
        android:textColor="#FFFFFF" />

    <Button
        android:layout_marginTop="3dp"
        android:layout_marginLeft="3dp"
        android:id="@+id/txt4"
        android:layout_width="144dp"
        android:layout_height="80dp"
        android:layout_column="0"
        android:layout_row="3"
        android:background="#000000"
        android:textColor="#FFFFFF"
        android:textSize="50dp"
        android:text="4" />

    <Button
        android:layout_marginTop="3dp"
        android:layout_marginLeft="3dp"
        android:id="@+id/txt5"
        android:layout_width="144dp"
        android:layout_height="80dp"
        android:layout_column="1"
        android:layout_row="3"
        android:background="#000000"
        android:textColor="#FFFFFF"
        android:textSize="50dp"
        android:text="5" />

    <Button
        android:layout_marginTop="3dp"
        android:layout_marginLeft="3dp"
        android:id="@+id/txt6"
        android:layout_width="144dp"
        android:layout_height="80dp"
        android:layout_column="2"
        android:layout_row="3"
        android:background="#000000"
        android:textColor="#FFFFFF"
        android:textSize="50dp"
        android:text="6" />
    <Button
        android:layout_marginLeft="3dp"
        android:layout_marginTop="3dp"
        android:layout_marginRight="5dp"
        android:layout_marginBottom="3dp"
        android:id="@+id/sure"
        android:layout_width="153dp"
        android:layout_height="160dp"
        android:layout_columnSpan="2"
        android:layout_rowSpan="2"
        android:background="#000000"
        android:textColor="#FFFFFF"
        android:textSize="50dp"
        android:text="确  定" />

    <Button
        android:layout_marginTop="3dp"
        android:layout_marginLeft="3dp"
        android:layout_marginBottom="3dp"
        android:id="@+id/txt7"
        android:layout_width="144dp"
        android:layout_height="77dp"
        android:layout_column="0"
        android:layout_row="4"
        android:background="#000000"
        android:textColor="#FFFFFF"
        android:textSize="50dp"
        android:text="7" />

    <Button
        android:layout_marginTop="3dp"
        android:layout_marginLeft="3dp"
        android:layout_marginBottom="3dp"
        android:id="@+id/txt8"
        android:layout_width="144dp"
        android:layout_height="77dp"
        android:layout_column="1"
        android:layout_row="4"
        android:background="#000000"
        android:textColor="#FFFFFF"
        android:textSize="50dp"
        android:text="8" />

    <Button
        android:layout_marginTop="3dp"
        android:layout_marginLeft="3dp"
        android:id="@+id/txt9"
        android:layout_width="144dp"
        android:layout_height="77dp"
        android:layout_column="2"
        android:layout_row="4"
        android:background="#000000"
        android:textColor="#FFFFFF"
        android:textSize="50dp"
        android:layout_marginBottom="3dp"
        android:text="9" />

</GridLayout>
Java代码:
public class MainActivity extends AppCompatActivity {
    private EditText edt1,edt2;
    private String str1="",str2="",string="";
    private TextView textView;
    private int[] btidNum = { R.id.txt0, R.id.txt1, R.id.txt2, R.id.txt3,
            R.id.txt4, R.id.txt5, R.id.txt6, R.id.txt7, R.id.txt8, R.id.txt9};
    private Button[] buttons = new Button[btidNum.length];
    boolean flag=true;

    //控制第一个EditText中输入数据的长度
    TextWatcher tw = new TextWatcher() {
        //@Override
        public void beforeTextChanged(CharSequence s, int start, int count, int after) {
        }

        //@Override
        public void onTextChanged(CharSequence s, int start, int before, int count) {
        }

        //@Override
        public void afterTextChanged(Editable s) {
            if (s.toString().length() == 4) {
                if (edt1.isFocused()) {
                    edt1.clearFocus();
                    edt2.requestFocus();
//                    edt2.setText("1");
//                    edt2.setSelection(1);    //   设置光标的位置
                    string="";
                    flag=false; //第二个
                }
                else if(edt2.isFocusable()){
                    edt2.clearFocus();
                    edt1.requestFocus();
                    string="";
                    flag=true;//第一个
                }
            }
        }
    };

    @Override
    protected void onCreate(Bundle savedInstanceState) {
        super.onCreate(savedInstanceState);
        setContentView(R.layout.activity_main);

        edt1=(EditText)findViewById(R.id.edt1);
        edt1.addTextChangedListener(tw);
        edt2=(EditText)findViewById(R.id.edt2);
        edt2.addTextChangedListener(tw);
        textView=(TextView)findViewById(R.id.tv);
        edt1.requestFocus();
        GetNumber get = new GetNumber();
        for (int i = 0; i < btidNum.length; i++) {
            buttons[i] = (Button) findViewById(btidNum[i]);
            buttons[i].setOnClickListener(get);
        }
        ImageButton delete=(ImageButton)findViewById(R.id.delete);
        Button next=(Button)findViewById(R.id.next);
        Button sure=(Button)findViewById(R.id.sure);

        delete.setOnClickListener(new View.OnClickListener() {
            @Override
            public void onClick(View view) {
                if(str1.length()>0&&flag==true){
                    str1=str1.substring(0,str1.length()-1);
                    edt1.setText(str1);
                    edt1.setSelection(str1.length());
                    string=edt1.getText().toString();
                }else if(str2.length()>0&&flag==false){
                    str2=str2.substring(0,str2.length()-1);
                    edt2.setText(str2);
                    edt2.setSelection(str2.length());
                    string=edt2.getText().toString();
                }
            }

        });

        next.setOnClickListener(new View.OnClickListener() {
            @Override
            public void onClick(View view) {
                if(edt2.isFocusable()){
                    edt2.clearFocus();
                    edt1.requestFocus();
                    string="";
                    flag=true;
                }
            }
        });

        sure.setOnClickListener(new View.OnClickListener() {
            @Override
            public void onClick(View view) {
                str1=edt1.getText().toString().trim();
                str2=edt2.getText().toString().trim();
                textView.append(str1+"======="+str2+"\n");
            }
        });
    }

    // 给 EditText赋值
    class GetNumber implements View.OnClickListener {

        @Override
        public void onClick(View v) {
            String txt = ((Button) v).getText().toString();
            string=string+txt;
            if(flag==true){
                str1=string;
                edt1.setText(str1);
                edt1.setSelection(str1.length());
            }else if(flag==false){
                str2=string;
                edt2.setText(str2);
                edt2.setSelection(str2.length());
            }
        }
    }
}
如需屏蔽系统键盘,请借鉴上一篇
时间: 2024-12-18 13:18:41
