GFS分布式文件系统集群项目
群集环境

卷类型
| 卷名称 | 卷类型 | 空间大小 | Brick |
|---|---|---|---|
| dis-volume | 分布式卷 | 40G | node1(/b1)、node2(/b1) |
| stripe-volume | 条带卷 | 40G | node1(/c1)、node2(/c1) |
| rep-volume | 复制卷 | 20G | node3(/b1)、node4(/b1) |
| dis-stripe | 分布式条带卷 | 40G | node1(/d1)、node2(/d1)、node3(/d1)、node4(/d1) |
| dis-rep | 分布式复制卷 | 20G | node1(/e1)、node2(/e1)、node3(/e1)、node4(/e1) |
实验准备
1、为四台服务器服务器每台添加4个磁盘
![]()
2、修改服务器的名称
分别修改为node1、node2、node3、node4
[[email protected] ~]#hostnamectl set-hostname node1
[[email protected] ~]# su
3、将四台服务器上的磁盘格式化,并挂载
在这里我们使用脚本执行挂载
#进入opt目录
[[email protected] ~]# cd /opt
#磁盘格式化、挂载脚本
[[email protected] opt]# vim a.sh
#! /bin/bash
echo "the disks exist list:"
fdisk -l |grep ‘磁盘 /dev/sd[a-z]‘
echo "=================================================="
PS3="chose which disk you want to create:"
select VAR in `ls /dev/sd*|grep -o ‘sd[b-z]‘|uniq` quit
do
    case $VAR in
    sda)
        fdisk -l /dev/sda
        break ;;
    sd[b-z])
        #create partitions
        echo "n
                p

                w"  | fdisk /dev/$VAR

        #make filesystem
        mkfs.xfs -i size=512 /dev/${VAR}"1" &> /dev/null
    #mount the system
        mkdir -p /data/${VAR}"1" &> /dev/null
        echo -e "/dev/${VAR}"1" /data/${VAR}"1" xfs defaults 0 0\n" >> /etc/fstab
        mount -a &> /dev/null
        break ;;
    quit)
        break;;
    *)
        echo "wrong disk,please check again";;
    esac
done
#给于脚本执行权限
[[email protected] opt]# chmod +x a.sh
将脚本通过scp推送到其他三台服务器上
scp a.sh [email protected]:/opt
scp a.sh [email protected]:/opt
scp a.sh [email protected]:/opt
在四台服务器上执行脚本,并完成
这个只是样本
[[email protected] opt]# ./a.sh
the disks exist list:
==================================================
1) sdb
2) sdc
3) sdd
4) sde
5) quit
chose which disk you want to create:1      //选择要格式化的盘
Welcome to fdisk (util-linux 2.23.2).

Changes will remain in memory only, until you decide to write them.
Be careful before using the write command.

Device does not contain a recognized partition table
Building a new DOS disklabel with disk identifier 0x37029e96.

Command (m for help): Partition type:
   p   primary (0 primary, 0 extended, 4 free)
   e   extended
Select (default p): Partition number (1-4, default 1): First sector (2048-41943039, default 2048): Using default value 2048
Last sector, +sectors or +size{K,M,G} (2048-41943039, default 41943039): Using default value 41943039
Partition 1 of type Linux and of size 20 GiB is set

Command (m for help): The partition table has been altered!

Calling ioctl() to re-read partition table.
Syncing disks.
分别在四个服务器上查看挂载情况

4、设置hosts文件
在第一台node1上修改
#在文件末尾添加
vim /etc/hosts
192.168.45.133 node1
192.168.45.130 node2
192.168.45.134 node3
192.168.45.136 node4
通过scp将hosts文件推送给其他服务器和客户端
#将/etc/hosts文件推送给其他主机
[[email protected] opt]# scp /etc/hosts [email protected]:/etc/hosts
[email protected]‘s password:
hosts                                      100%  242    23.6KB/s   00:00
[[email protected] opt]# scp /etc/hosts [email protected]:/etc/hosts
[email protected]‘s password:
hosts                                      100%  242   146.0KB/s   00:00
[[email protected] opt]# scp /etc/hosts [email protected]:/etc/hosts
[email protected]‘s password:
hosts                                      100%  242   146.0KB/s   00:00
在其他服务器上查看推送情况
关闭所有服务器和客户端的防火墙
[[email protected] ~]# systemctl stop firewalld.service
[[email protected] ~]# setenforce 0
在客户端和服务器上搭建yum仓库
#进入yum文件路径
[[email protected] ~]# cd /etc/yum.repos.d/
#创建一个空文件夹
[[email protected] yum.repos.d]# mkdir abc
#将CentOS-文件全部移到到abc下
[[email protected] yum.repos.d]# mv CentOS-* abc
#创建私有yum源
[[email protected] yum.repos.d]# vim GLFS.repo
[demo]
name=demo
baseurl=http://123.56.134.27/demo
gpgcheck=0
enable=1

[gfsrepo]
name=gfsrepo
baseurl=http://123.56.134.27/gfsrepo
gpgcheck=0
enable=1

#重新加载yum源
[[email protected] yum.repos.d]# yum list
安装必要软件包
[[email protected] yum.repos.d]# yum -y install glusterfs glusterfs-server glusterfs-fuse glusterfs-rdma
在其他三台上进行同样的操作
在四台服务器上启动glusterd,并设置为开机自启动
[[email protected] yum.repos.d]# systemctl start glusterd.service
[[email protected] yum.repos.d]# systemctl enable glusterd.service
添加节点信息
[[email protected] yum.repos.d]# gluster peer probe node2
peer probe: success.
[[email protected] yum.repos.d]# gluster peer probe node3
peer probe: success.
[[email protected] yum.repos.d]# gluster peer probe node4
peer probe: success.
在其他服务器上查看节点信息
[[email protected] yum.repos.d]# gluster peer status
创建分布式卷
#创建分布式卷
[[email protected] yum.repos.d]# gluster volume create dis-vol node1:/data/sdb1 node2:/data/sdb1 force
#检查信息
[[email protected] yum.repos.d]# gluster volume info dis-vol
#查看分布式现有卷
[[email protected] yum.repos.d]# gluster volume list
#启动卷
[[email protected] yum.repos.d]# gluster volume start dis-vol
在客户端上挂载
#递归创建挂载点
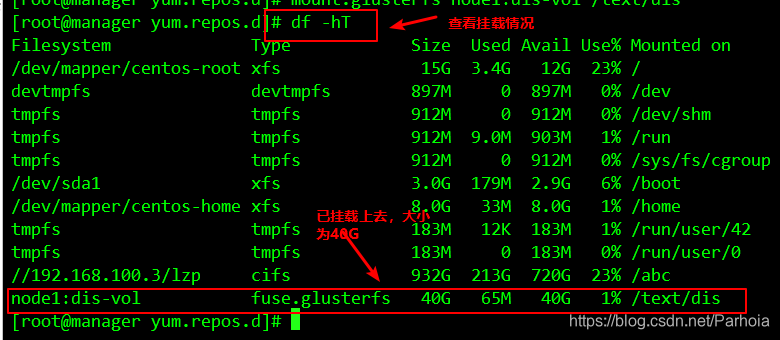
[[email protected] yum.repos.d]# mkdir -p /text/dis
#将刚才创建的卷挂载到刚才创建的挂载点下
[[email protected] yum.repos.d]# mount.glusterfs node1:dis-vol /text/dis
```
### 创建条带卷
```sql
#创建卷
[[email protected] yum.repos.d]# gluster volume create stripe-vol stripe 2 node1:/data/sdc1 node2:/data/sdc1 force
#查看现有卷
[[email protected] yum.repos.d]# gluster volume list
dis-vol
stripe-vol
#启动条带卷
[[email protected] yum.repos.d]# gluster volume start stripe-vol
volume start: stripe-vol: success在客户端挂载
#创建挂载点
[[email protected] yum.repos.d]# mkdir /text/strip
#挂载条带卷
[[email protected] yum.repos.d]# mount.glusterfs node1:/stripe-vol /text/strip/
创建复制卷
#创建复制卷
[[email protected] yum.repos.d]# gluster volume create rep-vol replica 2 node3:/data/sdb1 node4:/data/sdb1 force
volume create: rep-vol: success: please start the volume to access data
#开启复制卷
[[email protected] yum.repos.d]# gluster volume start rep-vol
volume start: rep-vol: success
在客户机挂碍复制卷
[[email protected] yum.repos.d]# mkdir /text/rep
[[email protected] yum.repos.d]# mount.glusterfs node3:rep-vol /text/rep
创建分布式条带
#创建分布式条带卷
[[email protected] yum.repos.d]# gluster volume create dis-stripe stripe 2 node1:/data/sdd1 node2:/data/sdd1 node3:/data/sdd1 node4:/data/sdd1 force
volume create: dis-stripe: success: please start the volume to access data
#启动分布式条带卷
[[email protected] yum.repos.d]# gluster volume start dis-stripe
volume start: dis-stripe: success
在客户机上挂载
[[email protected] yum.repos.d]# mkdir /text/dis-strip
[[email protected] yum.repos.d]# mount.glusterfs node4:dis-stripe /text/dis-strip/
创建分布式复制卷
#创建分布式复制卷
[[email protected] yum.repos.d]# gluster volume create dis-rep replica 2 node1:/data/sde1 node2:/data/sde1 node3:/data/sde1 node4:/data/sde1 force
volume create: dis-rep: success: please start the volume to access data
#开启复制卷
[[email protected] yum.repos.d]# gluster volume start dis-rep
volume start: dis-rep: success
# 查看现有卷
[[email protected] yum.repos.d]# gluster volume list
dis-rep
dis-stripe
dis-vol
rep-vol
stripe-vol
在客户端挂载
[[email protected] yum.repos.d]# mkdir /text/dis-rep
[[email protected] yum.repos.d]# mount.glusterfs node3:dis-rep /text/dis-rep/
------------------------上边我们完成了卷的创建和挂载,现在我们来进行卷的测试
首先在客户机上创建5个40M的文件
[[email protected] yum.repos.d]# dd if=/dev/zero of=/demo1.log bs=1M count=40
40+0 records in
40+0 records out
41943040 bytes (42 MB) copied, 0.0175819 s, 2.4 GB/s
[[email protected] yum.repos.d]# dd if=/dev/zero of=/demo2.log bs=1M count=40
40+0 records in
40+0 records out
41943040 bytes (42 MB) copied, 0.269746 s, 155 MB/s
[[email protected] yum.repos.d]# dd if=/dev/zero of=/demo3.log bs=1M count=40
40+0 records in
40+0 records out
41943040 bytes (42 MB) copied, 0.34134 s, 123 MB/s
[[email protected] yum.repos.d]# dd if=/dev/zero of=/demo4.log bs=1M count=40
40+0 records in
40+0 records out
41943040 bytes (42 MB) copied, 1.55335 s, 27.0 MB/s
[[email protected] yum.repos.d]# dd if=/dev/zero of=/demo5.log bs=1M count=40
40+0 records in
40+0 records out
41943040 bytes (42 MB) copied, 1.47974 s, 28.3 MB/s
然后复制5个文件到不同的卷上
[[email protected] yum.repos.d]# cp /demo* /text/dis
[[email protected] yum.repos.d]# cp /demo* /text/strip
[[email protected] yum.repos.d]# cp /demo* /text/rep
[[email protected] yum.repos.d]# cp /demo* /text/dis-strip
[[email protected] yum.repos.d]# cp /demo* /text/dis-rep
查看卷的内容
查看分布式卷


查看条带卷


查看复制卷


查看分布式条带卷


查看分布式复制卷


故障测试
关闭node2服务器观察结果
[[email protected] yum.repos.d]#  ls /text/
dis  dis-rep  dis-strip  rep  strip
[[email protected] yum.repos.d]# ls /text/dis
demo1.log  demo2.log  demo3.log  demo4.log
[[email protected] yum.repos.d]# ls /text/dis-rep
demo1.log  demo2.log  demo3.log  demo4.log  demo5.log
[[email protected] yum.repos.d]# ls /text/dis-strip/
demo5.log
[[email protected] yum.repos.d]# ls /text/rep/
demo1.log  demo2.log  demo3.log  demo4.log  demo5.log
[[email protected] yum.repos.d]# ls /text/strip/
[[email protected] yum.repos.d]#
结论:
 - 分布卷缺少demo5.log文件
 - 条带卷无法访问
 - 复制卷正常访问
 - 分布式条带卷缺少文件
 - 分布式复制卷正常访问
删除卷
要删除卷需要先停止卷,在删除卷的时候,卷组必须处于开启状态
#停止卷
[[email protected] yum.repos.d]# gluster volume delete dis-vol
#删除卷
[[email protected] yum.repos.d]# gluster volume delete dis-vol
访问控制
#仅拒绝
[[email protected] yum.repos.d]# gluster volume set dis-vol auth.reject 192.168.45.133
#仅允许
[[email protected] yum.repos.d]# gluster volume set dis-vol auth.allow 192.168.45.133
谢谢阅读!!!
原文地址:https://blog.51cto.com/14449521/2459805
时间: 2024-10-09 21:30:34