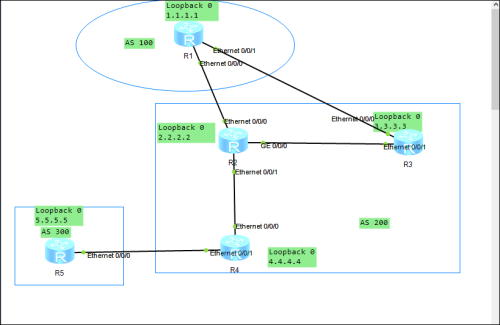
要求,使用BGP建立起邻居,而且全互联
每个路由器上都配置了Loopback 0 使用的是Loopback接口建立邻居
R1:
[R1]router id 1.1.1.1
[R1]bgp 100 本地的AS编号
[R1-bgp]peer 2.2.2.2 as-number 200 对方的AS编号
[R1-bgp]peer 2.2.2.2 connect-interface LoopBack 0 修改更新源
[R1-bgp]peer 2.2.2.2 next-hop-local 下一跳自我
[R1-bgp]peer 2.2.2.2 ebgp-max-hop 因为EBGP的TTL是1,所以需要修改TTL,默认255
[R1]ip route-static 2.2.2.0 24 12.1.1.2
[R1-bgp]peer 3.3.3.3 as-number 200
[R1-bgp]peer 3.3.3.3 connect-interface LoopBack 0
[R1-bgp]peer 3.3.3.3 next-hop-local
[R1-bgp]peer 3.3.3.3 ebgp-max-hop
[R1]ip route-static 3.3.3.0 255.255.255.0 13.1.1.3
R2:
[R2]router id 2.2.2.2
[R2]bgp 200
[R2-bgp]peer 1.1.1.1 as-number 100
[R2-bgp]peer 1.1.1.1 connect-interface LoopBack 0
[R2-bgp]peer 1.1.1.1 next-hop-local
[R2-bgp]peer 1.1.1.1 ebgp-max-hop
[R2]ip route-static 1.1.1.0 24 12.1.1.1
[R2-bgp]peer 3.3.3.3 as-number 200
[R2-bgp]peer 3.3.3.3 connect-interface LoopBack 0
[R2-bgp]peer 3.3.3.3 next-hop-local
[R2]ip route-static 3.3.3.0 24 23.1.1.3
[R2-bgp]peer 4.4.4.4 as-number 200
[R2-bgp]peer 4.4.4.4 connect-interface LoopBack 0
[R2-bgp]peer 4.4.4.4 next-hop-local
[R2]ip route-static 4.4.4.0 24 24.1.1.4
R3:
[R3]router id 3.3.3.3
[R3]bgp 200
[R3-bgp]peer 2.2.2.2 as-number 200
[R3-bgp]peer 2.2.2.2 connect-interface LoopBack 0
[R3-bgp]peer 2.2.2.2 next-hop-local
[R3]ip route-static 2.2.2.0 24 23.1.1.2
[R3-bgp]peer 1.1.1.1 as-number 100
[R3-bgp]peer 1.1.1.1 connect-interface LoopBack 0
[R3-bgp]peer 1.1.1.1 next-hop-local
[R3-bgp]peer 1.1.1.1 ebgp-max-hop
[R3]ip route-static 1.1.1.0 24 13.1.1.1
[R3-bgp]peer 4.4.4.4 as-number 200
[R3-bgp]peer 4.4.4.4 connect-interface LoopBack 0
[R3-bgp]peer 4.4.4.4 next-hop-local
R4:
[R4]bgp 200
[R4-bgp]peer 2.2.2.2 as-number 200
[R4-bgp]peer 2.2.2.2connect-interface LoopBack 0
[R4-bgp]peer 2.2.2.2 next-hop-local
[R4]ip route-static 2.2.2.0 24 24.1.1.2
[R4-bgp]peer 3.3.3.3 as-number 200
[R4-bgp]peer 3.3.3.3 connect-interface LoopBack 0
[R4-bgp]peer 3.3.3.3 next-hop-local
[R4-bgp]peer 5.5.5.5 as-number 300
[R4-bgp]peer 5.5.5.5 connect-interface LoopBack 0
[R4-bgp]peer 5.5.5.5 next-hop-local
[R4-bgp]peer 5.5.5.5 ebgp-max-hop
[R4]ip route-static 5.5.5.0 24 45.1.1.5
R5:
[R5-bgp]peer 4.4.4.4 as-number 200
[R5-bgp]peer 4.4.4.4 connect-interface LoopBack 0
[R5-bgp]peer 4.4.4.4 next-hop-local
[R5-bgp]peer 4.4.4.4 ebgp-max-hop
[R5]ip route-static 4.4.4.0 24 45.1.1.4
这样,邻居建立就完成了
需要路由的话,在BGP上network就行了。
接下来讲一下如何引入默认路由:
第一种方式
[R1]bgp 100
[R1-bgp]peer 2.2.2.2 default-route-advertise
第二种方式
[R1]ip route-static 0.0.0.0 0.0.0.0 NULL 0(目的是让默认路由出现在igp路由表里)
[R1-bgp]network 0.0.0.0 0
手工汇总:
第一种:
[R1]ip route-static 123.0.0.0 8 NULL 0
[R1-bgp]network 123.0.0.0 8
第二种:
aggregate 123.0.0.0 8
收到的是明细路由和汇总路由
抑制列表:
[R1]ip ip-prefix 1 permit 123.1.1.0 24 抑制你想抑制的网段
[R1]route-policy 10 permit node 10
[R1-route-policy]if-match ip-prefix 1 匹配
[R1]bgp 100
[R1-bgp]aggregate 123.0.0.0 8 suppress-policy 10 在123.0.0.0/8这个路由上一直123.1.1.0/24
路由反射器(RR)
1.客户机
2.服务器
3.非客户机
相当于一面镜子,通过这面镜子进行反射
①从EBGP学来的路由会发给所有的客户机和非客户机
②从非客户机学来的路由会发给所有的客户机
③从客户机学来的路由会发给除了该客户机以外的所有客户机和非客户机
配置命令
[R2-bgp]peer 3.3.3.3 reflect-client
Router-limit做限制
[R4-bgp]peer 5.5.5.5 route-limit 5 60 前面的5是限制多少个网段,后面的60是百分比,如果有3个就开始警告