1. V7000配置
1.1 POOL的划分
V7000共建立3个Array,形成一个pool mdiskgrp0,总的可用空间70.63TB:
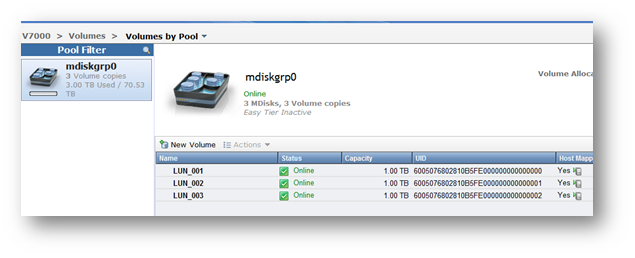
1.2 LUN划分
在mdiskgrp0这个pool里边新建3个LUN,每个大小1TB。

1.3 将LUN分配给主机
建立两个host,每个host包含2个wwpn. 在Linux上查看WWPN方法如下:
主机一:
|
[[email protected] ~]# cat /sys/class/fc_host/host6/port_name 0x10000000c9cff748 [[email protected] ~]# cat /sys/class/fc_host/host7/port_name 0x10000000c9cff749 |
主机二:
|
[[email protected] ~]# cat /sys/class/fc_host/host6/port_name 0x10000000c9cfedb4 [[email protected] ~]# cat /sys/class/fc_host/host7/port_name 0x10000000c9cfedb5 |
将3个LUN分配给这两个主机,使它们可以同时看到3个磁盘。

2 SAN配置
2.1 SAN结构
每个主机2个光纤口。通过zone的划分,使得两个主机FC端口分别通过不同的交换机访问到V7000的2个端口,这2个端口分别属于V7000的A、B控制器。最终在Linux系统中看到4条path。
SAN拓扑图:

2.2 SAN switch 10.61的配置
2.2.1 Alias
建立4个alias,如下:
|
alias: YT_RHLinux170_host6 10:00:00:00:c9:cf:f7:48 alias: YT_RHLinux171_host6 10:00:00:00:c9:cf:ed:b4 alias: YT_V7000_Node1_port3 50:05:07:68:02:35:d6:07 alias: YT_V7000_Node2_port3 50:05:07:68:02:35:d6:08 |
2.2.2 Zone
建立两个zone,每个Zone包含一个主机端口和2个V7000端口:
|
zone: YT_RHLinux170_V7000 YT_RHLinux170_host6; YT_V7000_Node1_port3; YT_V7000_Node2_port3 zone: YT_RHLinux171_V7000 YT_RHLinux171_host6; YT_V7000_Node1_port3; YT_V7000_Node2_port3 |
2.3 SAN switch 10.62的配置
2.3.1 Alias
建立4个alias,如下:
|
alias: YT_RHLinux170_host7 10:00:00:00:c9:cf:f7:49 alias: YT_RHLinux171_host7 10:00:00:00:c9:cf:ed:b5 alias: YT_V7000_Node1_port4 50:05:07:68:02:45:d6:07 alias: YT_V7000_Node2_port4 50:05:07:68:02:45:d6:08 |
2.3.2 zone
建立两个zone,每个Zone包含一个主机端口和2个V7000端口:
|
zone: YT_RHLinux170_V7000 YT_RHLinux170_host7; YT_V7000_Node1_port4; YT_V7000_Node2_port4 zone: YT_RHLinux171_V7000 YT_RHLinux171_host7; YT_V7000_Node1_port4; YT_V7000_Node2_port4 |
3 配置多路径软件
3.1 查看多路径软件是否已经安装
|
[[email protected] ~]# rpm -qa |grep multipath device-mapper-multipath-libs-0.4.9-46.el6.x86_64 device-mapper-multipath-0.4.9-46.el6.x86_64 |
3.2 编辑/etc/multipath.conf
新安装的系统,还没有/etc/multipath.conf这个文件。执行
| mpathconf --enable --with_multipathd y |
产生multipath.conf文件
然后编辑/etc/multipath.conf:
|
[[email protected] ~]# cat /etc/multipath.conf #blacklist_exceptions { # device { # vendor "IBM" # product "S/390.*" # } #} ## Use user friendly names, instead of using WWIDs as names. defaults { polling_interval 30 failback immediate no_path_retry queue rr_min_io 100 path_checker tur user_friendly_names yes } ## ## Here is an example of how to configure some standard options. ## # #defaults { # udev_dir /dev # polling_interval 10 # selector "round-robin 0" # path_grouping_policy multibus # getuid_callout "/lib/udev/scsi_id --whitelisted --device=/dev/%n" # prio alua # path_checker readsector0 # rr_min_io 100 # max_fds 8192 # rr_weight priorities # failback immediate # no_path_retry fail # user_friendly_names yes #} ## ## The wwid line in the following blacklist section is shown as an example ## of how to blacklist devices by wwid. The 2 devnode lines are the ## compiled in default blacklist. If you want to blacklist entire types ## of devices, such as all scsi devices, you should use a devnode line. ## However, if you want to blacklist specific devices, you should use ## a wwid line. Since there is no guarantee that a specific device will ## not change names on reboot (from /dev/sda to /dev/sdb for example) ## devnode lines are not recommended for blacklisting specific devices. ## #blacklist { # wwid 26353900f02796769 # devnode "^(ram|raw|loop|fd|md|dm-|sr|scd|st)[0-9]*" # devnode "^hd[a-z]" #} #multipaths { # multipath { # wwid 3600508b4000156d700012000000b0000 # alias yellow # path_grouping_policy multibus # path_checker readsector0 # path_selector "round-robin 0" # failback manual # rr_weight priorities # no_path_retry 5 # } # multipath { # wwid 1DEC_____321816758474 # alias red # } #} devices { # device { # vendor "COMPAQ " # product "HSV110 (C)COMPAQ" # path_grouping_policy multibus # getuid_callout "/lib/udev/scsi_id --whitelisted --device=/dev/%n" # path_checker readsector0 # path_selector "round-robin 0" # hardware_handler "0" # failback 15 # rr_weight priorities # no_path_retry queue # } # device { # vendor "COMPAQ " # product "MSA1000 " # path_grouping_policy multibus # } # SVC device { vendor "IBM" product "2145" path_grouping_policy group_by_prio prio "alua" }
} blacklist { # devnode ".*" } [[email protected] ~]# |
3.3 配置多路径进程开机自动启动
|
chkconfig multipathd on chkconfig --level 345 multipathd on |
3.4 重启服务让配置生效
| service multipathd reload |
Multipath –v2识别多路径,如果仍然看不到磁盘,则需要reboot系统。
3.5 查看多路径
使用命令multipath –ll查看多路径情况:
|
[[email protected] ~]# multipath –ll mpathd (36005076802810b5fe000000000000002) dm-2 IBM,2145 size=1.0T features=‘1 queue_if_no_path‘ hwhandler=‘0‘ wp=rw |-+- policy=‘round-robin 0‘ prio=50 status=active | |- 6:0:0:2 sdc 8:32 active ready running | `- 7:0:0:2 sdj 8:144 active ready running `-+- policy=‘round-robin 0‘ prio=10 status=enabled |- 6:0:1:2 sdf 8:80 active ready running `- 7:0:1:2 sdm 8:192 active ready running mpathc (36005076802810b5fe000000000000001) dm-1 IBM,2145 size=1.0T features=‘1 queue_if_no_path‘ hwhandler=‘0‘ wp=rw |-+- policy=‘round-robin 0‘ prio=50 status=active | |- 6:0:1:1 sde 8:64 active ready running | `- 7:0:1:1 sdl 8:176 active ready running `-+- policy=‘round-robin 0‘ prio=10 status=enabled |- 6:0:0:1 sdb 8:16 active ready running `- 7:0:0:1 sdi 8:128 active ready running mpathb (36005076802810b5fe000000000000000) dm-0 IBM,2145 size=1.0T features=‘1 queue_if_no_path‘ hwhandler=‘0‘ wp=rw |-+- policy=‘round-robin 0‘ prio=50 status=active | |- 6:0:0:0 sda 8:0 active ready running | `- 7:0:0:0 sdh 8:112 active ready running `-+- policy=‘round-robin 0‘ prio=10 status=enabled |- 6:0:1:0 sdd 8:48 active ready running `- 7:0:1:0 sdk 8:160 active ready running |
4 GPFS配置过程
4.1 GPFS规划
我们要建立的是一个保护两个Redhat6.2 Linux节点。使用共享存储V7000的共3TB磁盘空间。
|
节点名 |
OS版本 |
磁盘 |
集群名 |
NSD |
|
IaYT2d3A01-gpfs |
Redhat6.2 |
dm-0;dm-1;dm-2 |
3ADB_CLUSTER |
nsd01;nsd02;nsd03 |
|
IaYT2d3A02-gpfs |
Redhat6.2 |
dm-0;dm-1;dm-2 |
3ADB_CLUSTER |
nsd01;nsd02;nsd03 |
为了理解方便,在以下配置中提到的node1均指IaYT2d3A01-gpfs
4.2 安装前提软件
gpfs需要ksh, compat-libstdc++, kernel-devel, gcc, gcc-c++, cpp软件包
|
yum -y install ksh compat-libstdc++ kernel-devel gcc gcc-c++ cpp |
4.3 安装GPFS软件
软件已经上传至两个Linux服务器的/tmp/gpfs下,解压后自动存放于/usr/lpp/mmfs/3.4下:
|
# chmod a+x gpfs_install_3.4.0-0_x86_64 # /tmp/gpfs_install_3.4.0-0_x86_64 --text-only |
安装:
| rpm -ivh /usr/lpp/mmfs/3.4/gpfs*.rpm |
4.4 安装gpfs补丁
在IBM网站
http://www-933.ibm.com/support/fixcentral/
下载最新GPFS补丁,上传至/tmp/gpfs/ptf。
|
#gzip -ad GPFS-3.4.0.24-x86_64-Linux.tar.gz #tar -xvf GPFS-3.4.0.24-x86_64-Linux.tar #rpm -Uvh /tmp/gpfs/ptf/gpfs*.rpm |
检查安装结果:
|
[[email protected] ptf]# rpm -qa|grep gpfs gpfs.gpl-3.4.0-24.noarch gpfs.docs-3.4.0-24.noarch gpfs.base-3.4.0-24.x86_64 gpfs.msg.en_US-3.4.0-24.noarch |
4.5 编辑/etc/hosts
每个系统配置一个内网IP用于GPFS节点间通信。
然后将IP和主机名加到每个系统的/etc/hosts中,例如:
|
[[email protected] ptf]# cat /etc/hosts 127.0.0.1 localhost localhost.localdomain localhost4 localhost4.localdomain4 ::1 localhost localhost.localdomain localhost6 localhost6.localdomain6 10.143.5.170 IaYT2d3A01 10.143.13.172 IaYT2d3A01-gpfs 10.143.5.171 IaYT2d3A02 10.143.13.173 IaYT2d3A02-gpfs |
4.6 编译生成Portability layer
GPFS需要借助Portability layer与kernel打交道。我们使用GPFS自带的工具进行编译。
每个节点分别执行:
|
cd /usr/lpp/mmfs/src make Autoconfig make World make InstallImages |
4.7 添加环境变量
每个节点上分别执行:
将下面一行加到/root/ .bash_profile中:
| PATH=$PATH:$HOME/bin:/usr/lpp/mmfs/bin |
4.8 建立节点间信任文件
1) 以下命令在每个节点上执行一遍
|
#cd /root/.ssh #ssh-keygen -t rsa #ssh-keygen -t dsa |
2) 在node 1上执行
|
# cat /root/.ssh/id_rsa.pub>>/root/.ssh/authorized_keys # cat /root/.ssh/id_dsa.pub>>/root/.ssh/authorized_keys #ssh node2 cat /root/.ssh/id_rsa.pub>>/root/.ssh/authorized_keys #ssh node2 cat /root/.ssh/id_dsa.pub>>/root/.ssh/authorized_keys #scp /root/.ssh/authorized_keys node2:/root/.ssh/authorized_keys |
3) 测试两个节点的信任关系
以下命令在两个节点分别执行
|
ssh node1 date ssh node2 date |
4.9 创建GPFS cluster
4.9.1 编辑节点定义文件
在node1,也即IaYT2d3A01上执行vi /tmp/gpfs/gpfsnodes, 加入下面两行:
|
IaYT2d3A01-gpfs:quorum-manager IaYT2d3A02-gpfs:quorum-manager |
4.9.2 创建cluster
1) 在node1上执行
| mmcrcluster -n /tmp/gpfs/gpfsnodes -p IaYT2d3A01-gpfs -s IaYT2d3A02-gpfs -C 3ADB_CLUSTER -r /usr/bin/ssh -R /usr/bin/scp |
2) 然后启动GPFS:
| mmstartup –a |
4.9.3 接受License
在node1上执行:
| mmchlicense server --accept -N IaYT2d3A01-gpfs,IaYT2d3A02-gpfs |
4.9.4 查看cluster配置
|
[[email protected] .ssh]# mmlscluster GPFS cluster information ======================== GPFS cluster name: 3ADB_CLUSTER.IaYT2d3A01-gpfs GPFS cluster id: 760841895814613401 GPFS UID domain: 3ADB_CLUSTER.IaYT2d3A01-gpfs Remote shell command: /usr/bin/ssh Remote file copy command: /usr/bin/scp GPFS cluster configuration servers: ----------------------------------- Primary server: IaYT2d3A01-gpfs Secondary server: IaYT2d3A02-gpfs Node Daemon node name IP address Admin node name Designation ----------------------------------------------------------------------------------------------- 1 IaYT2d3A01-gpfs 10.143.13.172 IaYT2d3A01-gpfs quorum-manager 2 IaYT2d3A02-gpfs 10.143.13.173 IaYT2d3A02-gpfs quorum-manager |
4.10 创建NSD
在node1上建立一个文件/tmp/gpfs/gpfsnsd,包含:
|
dm-0:::dataAndMetadata:1:nsd01 dm-1:::dataAndMetadata:1:nsd02 dm-2:::dataAndMetadata:1:nsd03 |
然后执行命令:
mmcrnsd -F gpfsnsd
4.11 创建GPFS文件系统
在Node1上执行:
mmcrfs /gpfs gpfsdev -F gpfsnsd -B 512K -A yes -n 3
4.12 配置GPFS参数
1) 停止GPFS服务
mmshutdown -a
2) 在node1 上执行:
mmchconfig autoload=yes
mmchconfig pagepool=512M
mmchconfig prefetchThreads=72
mmchconfig worker1Threads=300
mmchconfig maxMBpS=1024
mmchconfig tiebreakerDisks="nsd01"
3) 启动GPFS服务:
mmstartup -a
4.13 检查GPFS状态
[[email protected] .ssh]# mmlscluster
GPFS cluster information
========================
GPFS cluster name: 3ADB_CLUSTER.IaYT2d3A01-gpfs
GPFS cluster id: 760841895814613401
GPFS UID domain: 3ADB_CLUSTER.IaYT2d3A01-gpfs
Remote shell command: /usr/bin/ssh
Remote file copy command: /usr/bin/scp
GPFS cluster configuration servers:
-----------------------------------
Primary server: IaYT2d3A01-gpfs
Secondary server: IaYT2d3A02-gpfs
Node Daemon node name IP address Admin node name Designation
-----------------------------------------------------------------------------------------------
1 IaYT2d3A01-gpfs 10.143.13.172 IaYT2d3A01-gpfs quorum-manager
2 IaYT2d3A02-gpfs 10.143.13.173 IaYT2d3A02-gpfs quorum-manager
[[email protected] .ssh]# df -m
Filesystem 1M-blocks Used Available Use% Mounted on
/dev/sdg3 837862 6611 788690 1% /
tmpfs 16038 1 16038 1% /dev/shm
/dev/sdg1 124 32 86 28% /boot
/dev/gpfsdev 3145728 9934 3135794 1% /gpfs
[[email protected] .ssh]# mmdf gpfs
mmdf: File system gpfs is not known to the GPFS cluster.
mmdf: Command failed. Examine previous error messages to determine cause.
[[email protected] .ssh]# mmdf gpfsdev
disk disk size failure holds holds free KB free KB
name in KB group metadata data in full blocks in fragments
--------------- ------------- -------- -------- ----- -------------------- -------------------
Disks in storage pool: system (Maximum disk size allowed is 8.0 TB)
nsd01 1073741824 1 Yes Yes 1070353920 (100%) 1328 ( 0%)
nsd02 1073741824 1 Yes Yes 1070350336 (100%) 1328 ( 0%)
nsd03 1073741824 1 Yes Yes 1070348800 (100%) 960 ( 0%)
------------- -------------------- -------------------
(pool total) 3221225472 3211053056 (100%) 3616 ( 0%)
============= ==================== ===================
(total) 3221225472 3211053056 (100%) 3616 ( 0%)
Inode Information
-----------------
Number of used inodes: 4009
Number of free inodes: 496727
Number of allocated inodes: 500736
Maximum number of inodes: 3146752
[[email protected] .ssh]# mmgetstate -a -L
Node number Node name Quorum Nodes up Total nodes GPFS state Remarks
------------------------------------------------------------------------------------
1 IaYT2d3A01-gpfs 1* 2 2 active quorum node
2 IaYT2d3A02-gpfs 1* 2 2 active quorum node
[[email protected] .ssh]# mmlsconfig
Configuration data for cluster 3ADB_CLUSTER.IaYT2d3A01-gpfs:
------------------------------------------------------------
myNodeConfigNumber 1
clusterName 3ADB_CLUSTER.IaYT2d3A01-gpfs
clusterId 760841895814613401
autoload yes
minReleaseLevel 3.4.0.7
dmapiFileHandleSize 32
pagepool 512M
prefetchThreads 72
worker1Threads 300
maxMBpS 1024
tiebreakerDisks nsd01
adminMode central
File systems in cluster 3ADB_CLUSTER.IaYT2d3A01-gpfs:
-----------------------------------------------------
/dev/gpfsdev
[[email protected] .ssh]# mmlsnsd
File system Disk name NSD servers
---------------------------------------------------------------------------
gpfsdev nsd01 (directly attached)
gpfsdev nsd02 (directly attached)
gpfsdev nsd03 (directly attached)
[[email protected] .ssh]# mmlsdisk gpfsdev -L
disk driver sector failure holds holds storage
name type size group metadata data status availability disk id pool remarks
------ ------ ------ ------- -------- ----- -------- ------------ ------- ----------------
nsd01 nsd 512 1 Yes Yes ready up 1 system desc
nsd02 nsd 512 1 Yes Yes ready up 2 system desc
nsd03 nsd 512 1 Yes Yes ready up 3 system desc
Number of quorum disks: 3
Read quorum value: 2
Write quorum value: 2
[[email protected] .ssh]# mmlsfs gpfsdev
flag value description
------------------- ------------------------ -----------------------------------
-f 16384 Minimum fragment size in bytes
-i 512 Inode size in bytes
-I 16384 Indirect block size in bytes
-m 1 Default number of metadata replicas
-M 2 Maximum number of metadata replicas
-r 1 Default number of data replicas
-R 2 Maximum number of data replicas
-j cluster Block allocation type
-D nfs4 File locking semantics in effect
-k all ACL semantics in effect
-n 3 Estimated number of nodes that will mount file system
-B 524288 Block size
-Q none Quotas enforced
none Default quotas enabled
--filesetdf No Fileset df enabled?
-V 12.10 (3.4.0.7) File system version
--create-time Thu Sep 26 13:54:52 2013 File system creation time
-u Yes Support for large LUNs?
-z No Is DMAPI enabled?
-L 4194304 Logfile size
-E Yes Exact mtime mount option
-S No Suppress atime mount option
-K whenpossible Strict replica allocation option
--fastea Yes Fast external attributes enabled?
--inode-limit 3146752 Maximum number of inodes
-P system Disk storage pools in file system
-d nsd01;nsd02;nsd03 Disks in file system
-A yes Automatic mount option
-o none Additional mount options
-T /gpfs Default mount point
--mount-priority 0 Mount priority
原文地址:https://www.cnblogs.com/shuijinzi/p/11951971.html