实验课题:搭建LAMP,安装Nginx,作为代理,将MySQL安装在单独的机器,apache负责动态,nginx负责静态
实验环境:
1、VMware Workstation 11
2、设备A:MySQL,IP地址:192.168.0.102,Host:mysql
3、设备B:Nginx+Apache+PHP,IP地址:192.168.0.107,Host:lanp 真机:192.168.0.104
4、Linux发行版:Centos 6.6 x86;
5、Nginx:http://nginx.org/download/nginx-1.6.2.tar.gz
6、Apache:get http://mirrors.sohu.com/apache/httpd-2.4.16.tar.gz
7、PHP:http://cn2.php.net/get/php-5.6.12.tar.gz
8、MySQL:http://mirrors.sohu.com/mysql/MySQL-5.5/mysql-5.5.42-linux2.6-i686.tar.gz
9、discuz:http://download.comsenz.com/DiscuzX/3.2/Discuz_X3.2_SC_UTF8.zip
10、wordpress:https://cn.wordpress.org/wordpress-4.2.2-zh_CN.tar.gz
11、phpmyadmin:https://files.phpmyadmin.net/phpMyAdmin/4.4.13.1/phpMyAdmin-4.4.13.1-all-languages.zip
12、pcre http://sourceforge.net/projects/pcre/files/pcre2/10.20/pcre2-10.20.tar.gz
13、apr http://mirror.bit.edu.cn/apache//apr/apr-1.5.2.tar.gz
14、apr-util http://mirror.bit.edu.cn/apache//apr/apr-util-1.5.4.tar.gz
15、epel-release http://mirrors.ustc.edu.cn/epel/6Server/x86_64/epel-release-6-8.noarch.rpm
16、libmcrypt
实验准备:
1、更换163下载源
mv /etc/yum.repos.d/CentOS-Base.repo /etc/yum.repos.d/CentOS-Base.repo.old
cd /etc/yum.repos.d/
wget http://mirrors.163.com/.help/CentOS6-Base-163.repo
mv CentOS6-Base-163.repo CentOS-Base.repo
yum clean all
yum makecache (注意替换CentOS-Base.repo $Realease :1,$s/$Realease/6.6/g)
yum -y update
2、分别在设备A和B中下载各个软件;
3、更新系统时间;
crontab -e */30 * * * * ntpdate 210.72.145.44 > /dev/null 2>&1
4、清空Iptables,关闭Selinux,或者添加数据库和网站的访问权限。
-A INPUT -p tcp -m state --state NEW -m tcp --dport 80 -j ACCEPT
-A INPUT -m state --state NEW -m tcp -p tcp --dport 88 -j ACCEPT ##
-A INPUT -m state --state NEW -m tcp -p tcp --dport 3306 -j ACCEPT
5.安装依赖包
yum -y install ntp make openssl openssl-devel pcre pcre-devel libpng libpng-devel libtiff-devel libjpeg-6b libjpeg-devel-6b freetype freetype-devel gd gd-devel fontconfig-devel zlib zlib-devel libevent-devel gcc gcc-c++ flex bison bzip2 bzip2-devel libXpm libXpm-devel ncurses ncurses-devel libmcrypt libmcrypt-devel libxml2 libxml2-devel imake autoconf automake screen sysstat compat-libstdc++-33 curl curl-devel
实验步骤:
设备A:mysql
tar zxvf /usr/local/src/mysql-5.5.42-linux2.6-i686.tar.gz
mv mysql-5.5.42-linux2.6-i686 /usr/local/mysql
useradd -s /sbin/nologin mysql
cd /usr/local/mysql
mkdir -p /data/mysql
chown -R mysql:mysql /data/mysql
./scripts/mysql_install_db --user=mysql --datadir=/data/mysql
cp support-files/my-large.cnf /etc/my.cnf
cp support-files/mysql.server /etc/init.d/mysqld
chmod 755 /etc/init.d/mysqld
vim /etc/init.d/mysqld #修改datadir=/usr/local/mysql
chkconfig --add mysqld
chkconfig mysqld on
service mysqld start
mysql -uroot -p <输入你的mysql登录密码>
create database discuz;
create database wordpress;
grant all on discuz.* to ‘youruser‘@‘lyourhostip‘ identified by ‘yourpassword‘;
grant all on wordpress .* to ‘youruser‘@‘lyourhostip‘ identified by ‘yourpassword‘;
quit
设备B:lanp
一、安装Apache
tar zxvf /usr/local/src/httpd-2.4.16.tar.gz
tar zxvf /usr/local/src/apr-1.5.2.tar.gz
tar zxvf /usr/local/src/apr-util-1.5.4.tar.gz
mv /usr/loca/src/apr-1.5.2 /usr/loca/src/httpd-2.4.16/srclib/apr
mv /usr/local/src/apr-util-1.5.4 /usr/loca/src/httpd-2.4.16/srclib/apr-util
cd /usr/loca/src/httpd-2.4.16
./configure \--prefix=/usr/local/apache2 \--with-included-apr \--enable-so \--enable-deflate=shared \--enable-expires=shared \--enable-rewrite=shared
make && make install
cp /usr/local/apache2/bin/apachectl /etc/init.d/httpd
vim /etc/init.d/httpd
在第一行#!/bin/sh下增加两行文字
# chkconfig: 35 70 30
# description: Apache
保存退出
chkconfig --level 35 httpd on
二、安装PHP
tar zxf /usr/local/src/php-5.6.12.tar.gz
cd php-5.6.12
./configure \--prefix=/usr/local/php \--with-apxs2=/usr/local/apache2/bin/apxs \--with-config-file-path=/usr/local/php/etc \ --with-mysql=mysqlnd \ --with-mysqli=mysqlnd \ --with-pdo-mysql=mysqlnd \--with-libxml-dir \--with-gd \--with-jpeg-dir \--with-png-dir \--with-freetype-dir \--with-iconv-dir \--with-zlib-dir \--with-bz2 \--with-openssl \--with-mcrypt \--enable-soap \--enable-gd-native-ttf \--enable-mbstring \--enable-sockets \--enable-exif \--disable-ipv6
##使用了php自带的对mysql的驱动程序mysqlnd
make && make install
cp /usr/local/src/php-5.6.12/php.ini-production /usr/local/php/etc/php.ini
三、配置PHP和Apache结合
vim /usr/local/apache2/conf/httpd.conf 找到: AddType application/x-gzip .gz .tgz
在该行下面添加: AddType application/x-httpd-php .php
找到:
<IfModule dir_module>
DirectoryIndex index.html
</IfModule>
将该行改为:
<IfModule dir_module>
DirectoryIndex index.html index.htm index.php
</IfModule>
找到:#ServerName www.example.com:80 修改为:ServerName localhost:88
找到:listen:80 修改为:listen:88
添加granted allow from all
<Directory />
AllowOverride none
Require all granted
Allow from all
</Directory>
查看是否存在modules/libphp5.so
修改 vim /usr/local/apache2/conf/extra/httpd-vhosts.conf
<VirtualHost *:88>
DocumentRoot "/date/discuz/"
ServerName bbs.chinaops.com
ErrorLog "logs/bbs.chinaops.com-error_log"
CustomLog "logs/bbs.chinaops.com-access_log" common
</VirtualHost>
<VirtualHost *:88>
DocumentRoot "/date/blog/"
ServerName blog.chinaops.com
ErrorLog "logs/blog.chinaops.com-error_log"
CustomLog "logs/blog.chinaops.com-access_log" common
</VirtualHost>
<VirtualHost *:88>
DocumentRoot "/date/pma/"
ServerName pma.chinaops.com
ErrorLog "logs/pma.chinaops.com-error_log"
CustomLog "logs/pma.chinaops.com-access_log" common
</VirtualHost>
service httpd -t (检查错误)
service httpd graceful(加载配置)
查看httpd的运行情况
netstat -lnp | grep httpd
四、安装nginx
tar zxvf /usr/local/src/nginx-1.6.2.tar.gz
cd nginx-1.6.2
yum install -y pcre-devel
./configure --prefix=/usr/local/nginx --with-pcre
make
make instal
编写nginx启动脚本
vim /etc/init.d/nginx //加入如下内容
#!/bin/bash
# chkconfig: - 30 21
# description: http service.
# Source Function Library
. /etc/init.d/functions
# Nginx Settings
NGINX_SBIN="/usr/local/nginx/sbin/nginx"
NGINX_CONF="/usr/local/nginx/conf/nginx.conf"
NGINX_PID="/usr/local/nginx/logs/nginx.pid"
RETVAL=0
prog="Nginx"
start() {
echo -n $"Starting $prog: "
mkdir -p /dev/shm/nginx_temp
daemon $NGINX_SBIN -c $NGINX_CONF
RETVAL=$?
echo
return $RETVAL
}
stop() {
echo -n $"Stopping $prog: "
killproc -p $NGINX_PID $NGINX_SBIN -TERM
rm -rf /dev/shm/nginx_temp
RETVAL=$?
echo
return $RETVAL
}
reload(){
echo -n $"Reloading $prog: "
killproc -p $NGINX_PID $NGINX_SBIN -HUP
RETVAL=$?
echo
return $RETVAL
}
restart(){
stop
start
}
configtest(){
$NGINX_SBIN -c $NGINX_CONF -t
return 0
}
case "$1" in
start)
start
;;
stop)
stop
;;
reload)
reload
;;
restart)
restart
;;
configtest)
configtest
;;
*)
echo $"Usage: $0 {start|stop|reload|restart|configtest}"
RETVAL=1
esac
exit $RETVAL
将nginx服务启动
chmod a+x /etc/init.d/nginx
chkconfig --add nginx
chkconfig nginx on
配置nginx
> /usr/local/nginx/conf/nginx.conf
vim /usr/local/nginx/conf/nginx.conf
user nobody nobody;
worker_processes 2;
error_log /usr/local/nginx/logs/nginx_error.log crit;
pid /usr/local/nginx/logs/nginx.pid;
worker_rlimit_nofile 51200;

events
{     use epoll;     worker_connections 6000;
}

http
{     include mime.types;     default_type application/octet-stream;     server_names_hash_bucket_size 3526;     server_names_hash_max_size 4096;     log_format combined_realip ‘$remote_addr $http_x_forwarded_for [$time_local]‘     ‘$host "$request_uri" $status‘     ‘"$http_referer" "$http_user_agent"‘;     sendfile on;     tcp_nopush on;     keepalive_timeout 30;     client_header_timeout 3m;     client_body_timeout 3m;     send_timeout 3m;     connection_pool_size 256;     client_header_buffer_size 1k;     large_client_header_buffers 8 4k;     request_pool_size 4k;     output_buffers 4 32k;     postpone_output 1460;     client_max_body_size 10m;     client_body_buffer_size 256k;     client_body_temp_path /usr/local/nginx/client_body_temp;     proxy_temp_path /usr/local/nginx/proxy_temp;     fastcgi_temp_path /usr/local/nginx/fastcgi_temp;     fastcgi_intercept_errors on;     tcp_nodelay on;     gzip on;     gzip_min_length 1k;     gzip_buffers 4 8k;     gzip_comp_level 5;     gzip_http_version 1.1;     gzip_types text/plain application/x-javascript text/css text/htm application/xml;     include vhosts/*.conf;
配置nginx 虚拟主机
mkdir -p /usr/local/nginx/conf/vhosts
在vhosts下面创建三个文件bbs.conf blog.conf pma.conf
配置bbs.conf
server
{
listen 80;
server_name bbs.chinaops.com;
index index.html index.htm index.php;
root /date/bbs;
#根据user_agent控制
if ($http_user_agent ~ ‘bingbot/2.0|MJ12bot/v1.4.2|Spider/3.0|YoudaoBot|Tomato|Gecko/20100315‘){
return 403;
}
location ~ admin.php {
allow 192.168.0.104; ##真机
deny all;
proxy_pass http://127.0.0.1:88;
proxy_set_header Host $host;
}
location ~ \.php$ {
proxy_pass http://127.0.0.1:88;
proxy_set_header Host $host;
proxy_set_header X-Real-IP $remote_addr;
proxy_set_header X-Forwarded-For $proxy_add_x_forwarded_for;
}
location ~ .*\.(js|css)?$
{
expires 24h;
access_log off;
}
location ~* ^.+\.(gif|jpg|png|swf|flv|rar|zip|doc|pdf|gz|bz2|jpeg|bmp|xls)$ {
expires 7d;
valid_referers none blocked server_names *.baidu.com\
*.google.com *.google.cn *.soso.com ;
if ($invalid_referer) {
return 403;
#rewrite ^/ http://www.example.com/nophoto.gif;
}
access_log off;
}
rewrite ^([^\.]*)/topic-(.+)\.html$ $1/portal.php?mod=topic&topic=$2 last;
rewrite ^([^\.]*)/forum-(\w+)-([0-9]+)\.html$ $1/forum.php?mod=forumdisplay&fid=$2&page=$3 last;
rewrite ^([^\.]*)/thread-([0-9]+)-([0-9]+)-([0-9]+)\.html$ $1/forum.php?mod=viewthread&tid=$2&extra=page%3D$4&page=$3 last;
rewrite ^([^\.]*)/group-([0-9]+)-([0-9]+)\.html$ $1/forum.php?mod=group&fid=$2&page=$3 last;
rewrite ^([^\.]*)/space-(username|uid)-(.+)\.html$ $1/home.php?mod=space&$2=$3 last;
rewrite ^([^\.]*)/(fid|tid)-([0-9]+)\.html$ $1/index.php?action=$2&value=$3 last;
access_log /home/logs/discuz.log combined_realip;
}
配置blog.conf (参考 http://www.upupw.net/nginxhelp/n33.html)
server
{
listen 80;
server_name blog.chinaops.com;
index index.html index.htm index.php;
root /date/blog;
location /wp-admin/ {
allow 192.168.0.104;
deny all;
location ~ \.php$ {
proxy_pass http://127.0.0.1:88;
proxy_set_header Host $host;
}
}
location / {
proxy_pass http://127.0.0.1:88/;
proxy_set_header Host $host;
proxy_set_header X-Real-IP $remote_addr;
proxy_set_header X-Forwarded-For $proxy_add_x_forwarded_for;
}
}
配置pma.conf
server
{
listen 80;
server_name pma.chinaops.com;
index index.html index.htm index.php;
root /date/pma;
location / {
auth_basic "Auth";
auth_basic_user_file /usr/local/nginx/conf/htpasswd;
location ~ \.php$ {
proxy_pass http://127.0.0.1:88;
proxy_set_header Host $host;
proxy_set_header X-Real-IP $remote_addr;
proxy_set_header X-Forwarded-For $proxy_add_x_forwarded_for;
}
}
}
service nginx configtest
service nginx rsstart
五、discuz、wordpress、phpmyadmin配置
mkdir -p /date/{dixcuz,blog,pma}
配置discuz
useradd -s /sbin/nologin daemon
unzip Discuz_X3.2_SC_UTF8.zip
将upload里面的文件移到 网站监控目录下/date/discuz/
cd /data/discuz/
chown -R daemon.daemon config/ data/ uc_client/data/ uc_server/data/
在真机192.168.0.104修改vhost
192.168.0.104 bbs.chinaops.com blog.chinaops.com pma.chinaops.com
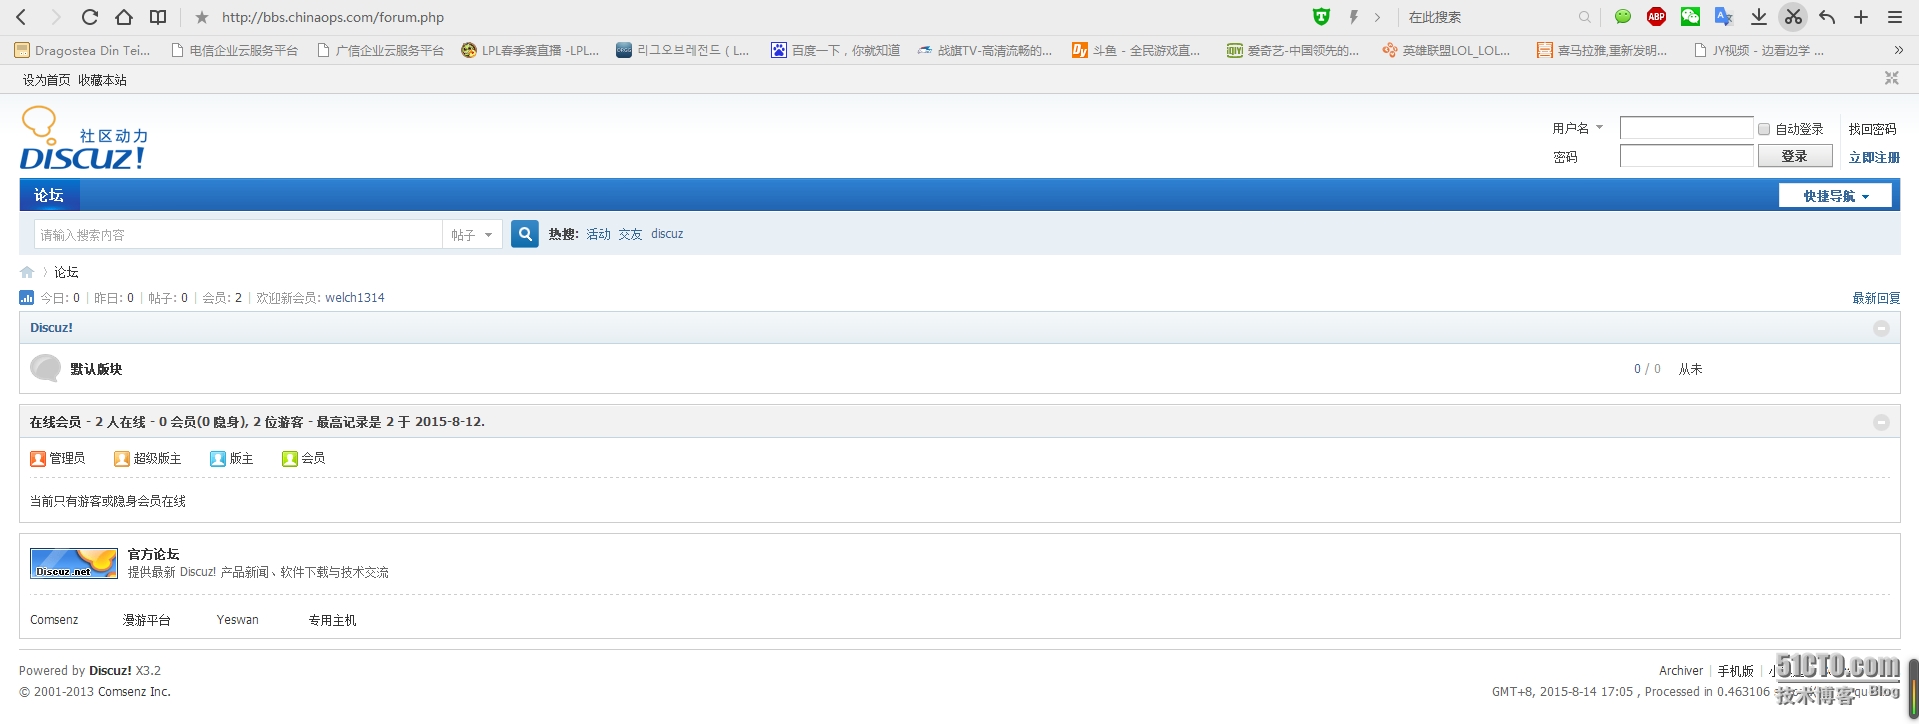
访问bbs.chinaops.com 填写数据库的IP地址,数据库的用户名密码及创建admin的密码
配置wordpress
cd /date
tar zxvf wordpress-4.2.2-zh_CN.tar.gz
mv wordpress-4.2.2-zh_CN blog
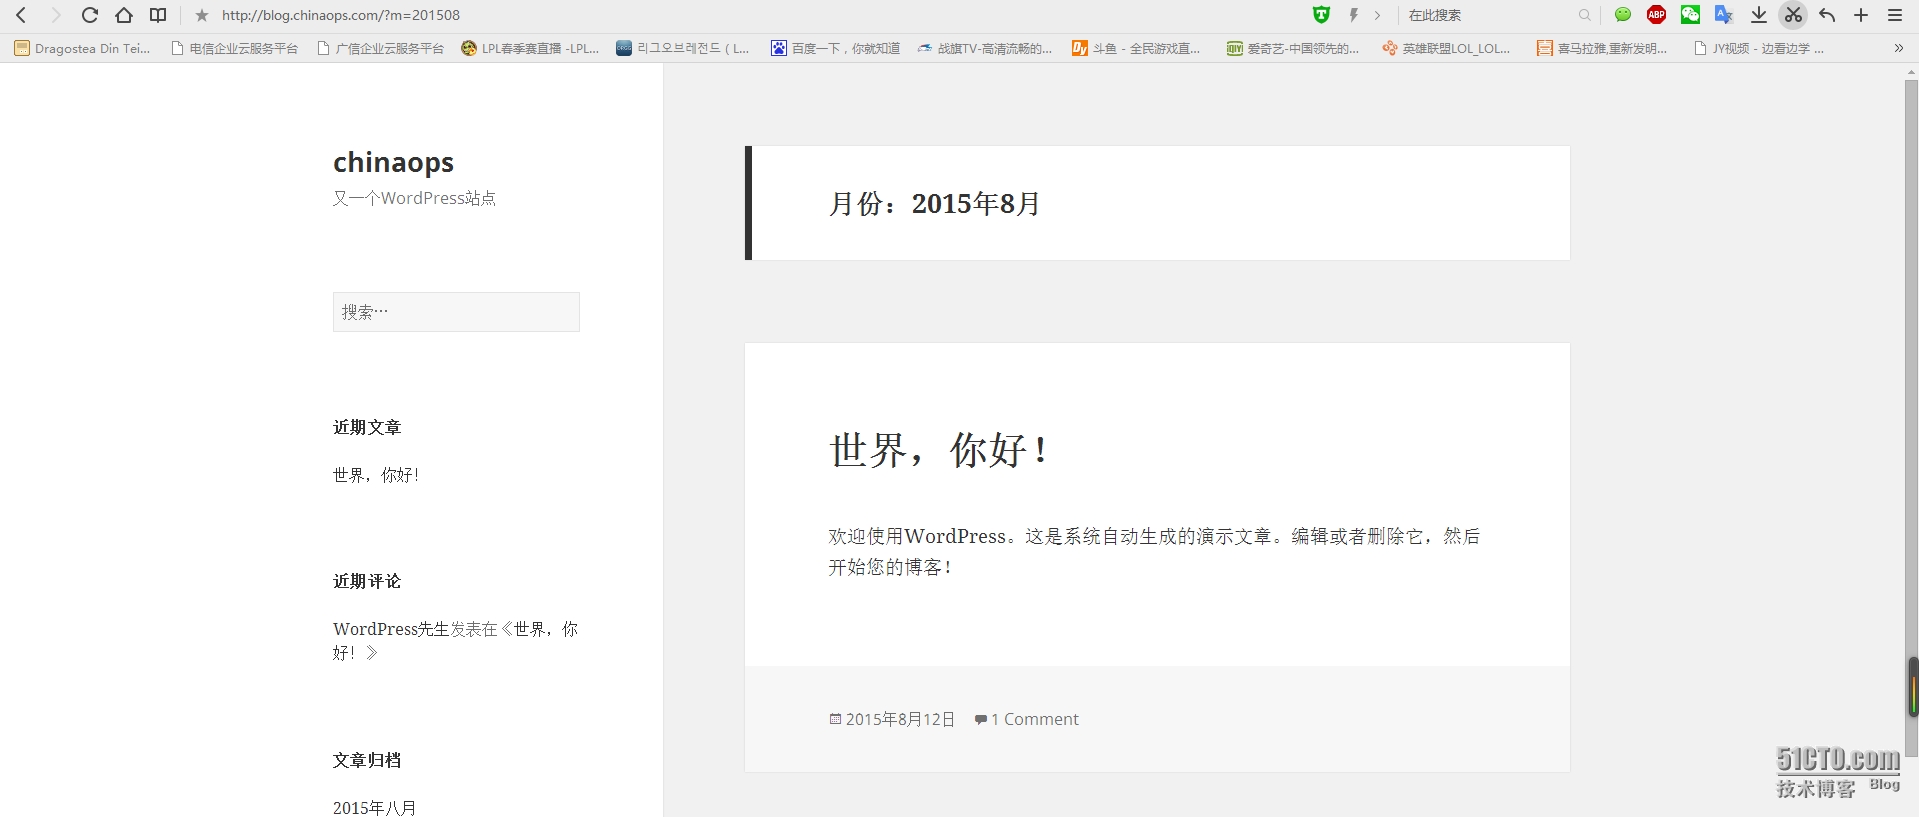
访问blog.chinaops.com/wp-admin/ 填写数据库的IP,数据库的用户名密码
配置phpmyadmin
cd /date
unzip phpMyAdmin-4.4.13.1-all-languages.zip
mv phpMyAdmin-4.4.13.1-all-languages pma
cd pma
cp libraries/config.default.php config.inc.php
更改
$cfg[‘Servers‘][$i][‘user‘] = ‘root‘;
$cfg[‘Servers‘][$i][‘password‘] = ‘yourrootpassword‘;
$cfg[‘Servers‘][$i][‘host‘] = ‘yourdbip‘;
$cfg[‘Servers‘][$i][‘auth_type‘] = ‘config‘;##认证模式
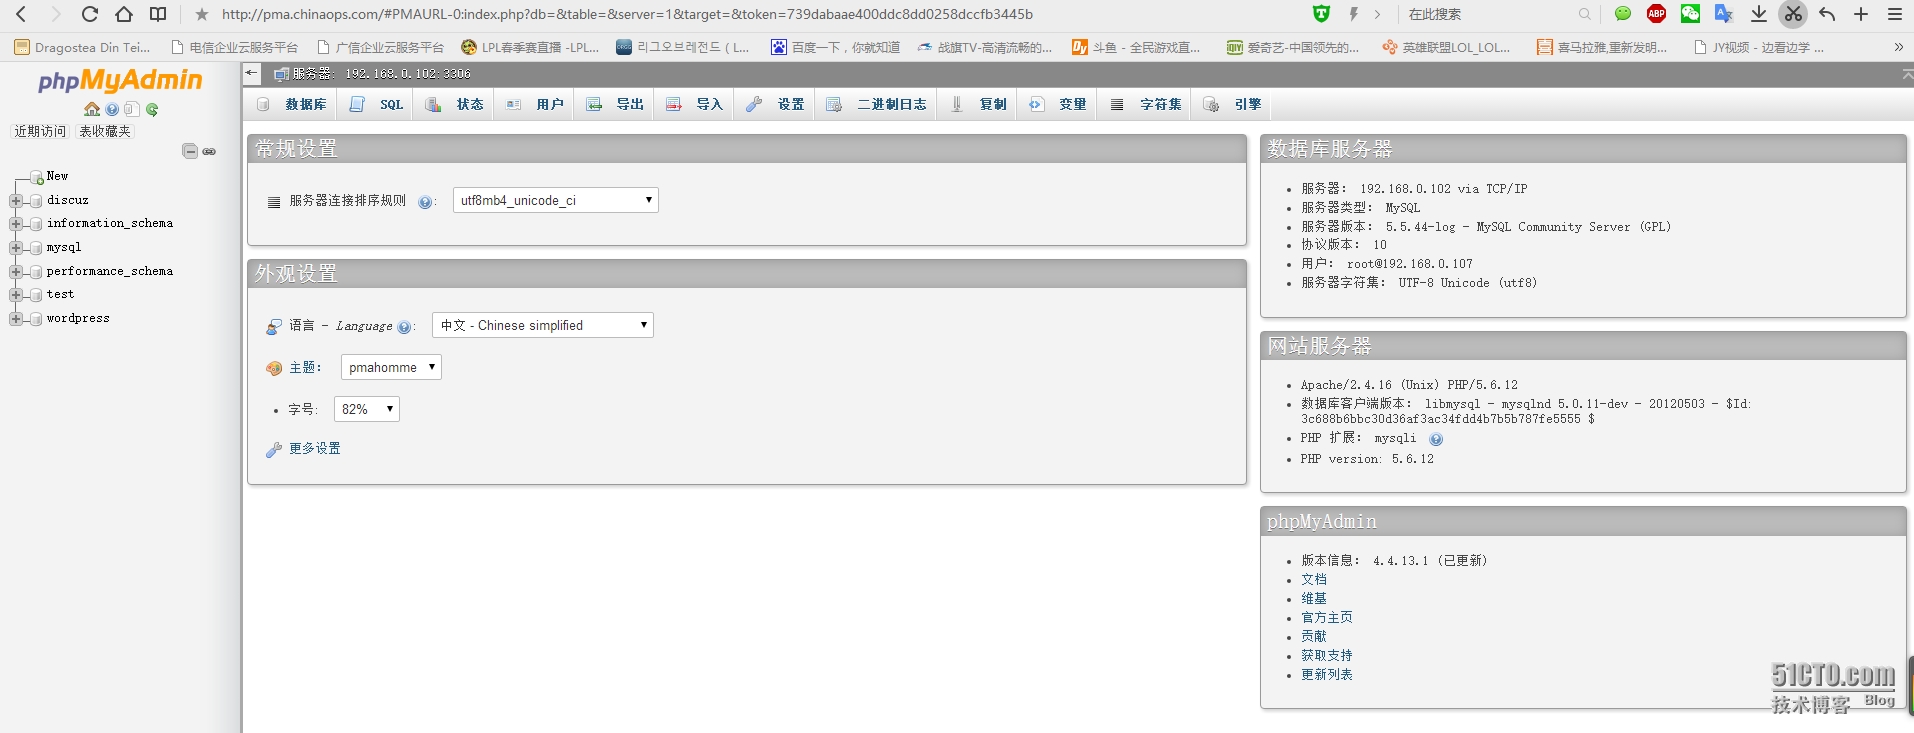
访问pma.chinaops.com 即可
博客转载于:http://linuxlearn.blog.51cto.com/1437234/1684733